Module TCG Admin (![[personal profile]](https://www.dreamwidth.org/img/silk/identity/user.png) moduleadmin) wrote in
moduleadmin) wrote in ![[community profile]](https://www.dreamwidth.org/img/silk/identity/community.png) module_staff2023-10-01 08:49 pm
module_staff2023-10-01 08:49 pm
Entry tags:
DECKMAKING GUIDE
Thank you for your interest in being a deckmaker at Module TCG! Deckmakers are a key part of the TCG - after all, what's a TCG without cards to collect?
If you are interested in being a deckmaker at Module in the future, or you are a current deckmaker and would like a refresher to keep your decks consistent with Module's current decks, this post details how to use the template and tips on image editing.
Please note: You will need an image editing program that can open and edit PSD files. Also, this guide uses screenshots from and directions for Adobe Photoshop CC. If you are using a different program like Photopea, an older version of Photoshop, etc, it may look different. (CC's the version I have access to - sorry! If these directions are different for you, please comment down below with your adjustments and I will add them to the post!)
First, download the file of all current deck templates at Module and unzip it. The zip file contains PSD templates for module/PV decks, puzzle decks, and compilation decks.
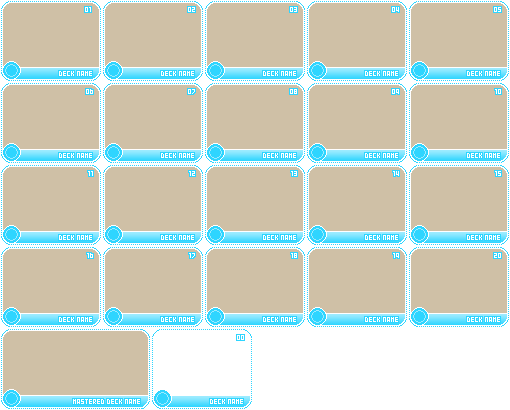
Each template file contains all 20 cards, the mastery badge, and a filler card. This allows you to create and adjust the entire deck in one file.
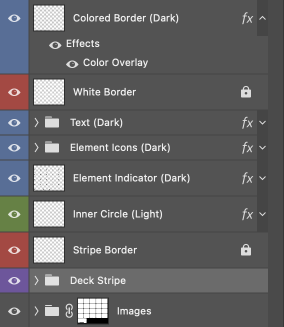
The deck template is made in separate layers, all of which are arranged in folders to make card editing as simple as possible.
Decks at Module primarily use two colors for their borders, one darker and one lighter. These can be any color that you feel best matches the images of the deck.
The layers and folders in the templates are named with what they contain. They are colored to help differentiate them. All layers assigned the same colors should be edited the same - that is, all the layers/folders assigned as blue should use the darker deck stripe color, and the green layers should use the light one. The layers in red shouldn't be edited at all, as they are for the white card borders; they are locked to prevent accidental editing.
Each part of the deck uses blending options (right click on the layer in the panel > Blending Options... to adjust). Text uses an outer glow as an outer border color, flat color adjustments use a color overlay, and deck stripes use a gradient overlay. Blending options apply across the entire deck, as the layers are linked. You can hide/unhide element indicator subfolders for the other four elements once you decide on a deck's element.
Blending options are applied on the folders for the text and element icons; other blending options are applied on the individual layers. To adjust parts like the deck stripe easily, adjust one layer and copy its style (right click on the layer in the panel > Copy Layer Style). Then, select all the layers within those folders and right click on the layer > Paste Layer Style).
The only exception to this is compilation decks, which use an assigned element color for the outer borders, element indicator, inner circle, and element icons. Please hide/unhide the subfolders within the Elemental Colors folder for those.
After that, it's on to pasting and editing your images for the deck! Each card has a subfolder within the Images folder to make editing each individual card easier - images will not spill into other cards, and adjustments will only apply to that card. If you want to apply an adjustment to all cards at once, you can add an adjustment layer to the very top of the Images folder.
Module's decknames are completely capitalized, so please make sure you are using uppercase characters.
Decks use the original language for their names, and transliterations if they were originally written in non-Latin characters. For example: HATSUNE MIKU, MEIKO V3, SUNA NO WAKUSEI.
Deck names can be easily changed for the entire deck by using Edit > Find and Replace Text....
If the name of a module/PV deck is too long, you can abbreviate it by using either a common shorthand for the name or your best judgment. (See the deck kimigairu for the song Aisarenakutemo Kimi ga Iru as an example.) For puzzle decks of songs, use the full name of the song (if it fits), a dash, the producer's name, and "feat." with the Vocaloid/voicebank used. For example, the deck ghostrule has the text "GHOST RULE - DECO*27 FEAT. HATSUNE MIKU" on the bottom. If the text doesn't fit, abbreviate the song title, not the producer or character name. If more than one vocal is featured in the song, list them as commas, then an & symbol between the final two voicebanks. For example, use "PRODUCER FEAT. HATSUNE MIKU, KAGAMINE RIN & KAGAMINE LEN" or "PRODUCER FEAT. KAGAMINE RIN & KAGAMINE LEN".
If the PV is sourced from a game such as Project Diva, Project mirai, or Project Sekai, add the source in parentheses if it fits (see GHOST RULE (DIVA FT)). Abbreviate it or omit it if it does not fit (KIRAWARETE IRU. (S), AKU NO MESHITSUKAI).
Decks should be named as follows:
For general tips:
The darker color used for the deck stripe should go on the bottom of the gradient.
PV decks should follow the video chronologically - that is, the beginning of the video should be card01, and the end should be card20. The mastery badge can be either a key part of the PV, the album art or YouTube thumbnail of the official upload (if included in the donation), etc.
When making puzzle decks, try to place the image's main features (like character faces, eyes, and so on) away from the numbers from each card.
While not required, you can use a mastery badge for puzzle decks that's different from the main deck image, if the donator provides it! This is an easy way to fit an alternate image from PVs that don't have enough image variation to make a full deck of 20 images (see the decks bug and anatasama as examples).
If you are interested in being a deckmaker at Module in the future, or you are a current deckmaker and would like a refresher to keep your decks consistent with Module's current decks, this post details how to use the template and tips on image editing.
Please note: You will need an image editing program that can open and edit PSD files. Also, this guide uses screenshots from and directions for Adobe Photoshop CC. If you are using a different program like Photopea, an older version of Photoshop, etc, it may look different. (CC's the version I have access to - sorry! If these directions are different for you, please comment down below with your adjustments and I will add them to the post!)
Using the Templates
First, download the file of all current deck templates at Module and unzip it. The zip file contains PSD templates for module/PV decks, puzzle decks, and compilation decks.
Each template file contains all 20 cards, the mastery badge, and a filler card. This allows you to create and adjust the entire deck in one file.
The deck template is made in separate layers, all of which are arranged in folders to make card editing as simple as possible.
Decks at Module primarily use two colors for their borders, one darker and one lighter. These can be any color that you feel best matches the images of the deck.
The layers and folders in the templates are named with what they contain. They are colored to help differentiate them. All layers assigned the same colors should be edited the same - that is, all the layers/folders assigned as blue should use the darker deck stripe color, and the green layers should use the light one. The layers in red shouldn't be edited at all, as they are for the white card borders; they are locked to prevent accidental editing.
Each part of the deck uses blending options (right click on the layer in the panel > Blending Options... to adjust). Text uses an outer glow as an outer border color, flat color adjustments use a color overlay, and deck stripes use a gradient overlay. Blending options apply across the entire deck, as the layers are linked. You can hide/unhide element indicator subfolders for the other four elements once you decide on a deck's element.
Blending options are applied on the folders for the text and element icons; other blending options are applied on the individual layers. To adjust parts like the deck stripe easily, adjust one layer and copy its style (right click on the layer in the panel > Copy Layer Style). Then, select all the layers within those folders and right click on the layer > Paste Layer Style).
The only exception to this is compilation decks, which use an assigned element color for the outer borders, element indicator, inner circle, and element icons. Please hide/unhide the subfolders within the Elemental Colors folder for those.
After that, it's on to pasting and editing your images for the deck! Each card has a subfolder within the Images folder to make editing each individual card easier - images will not spill into other cards, and adjustments will only apply to that card. If you want to apply an adjustment to all cards at once, you can add an adjustment layer to the very top of the Images folder.
Deck Text and Naming
Module's decknames are completely capitalized, so please make sure you are using uppercase characters.
Decks use the original language for their names, and transliterations if they were originally written in non-Latin characters. For example: HATSUNE MIKU, MEIKO V3, SUNA NO WAKUSEI.
Deck names can be easily changed for the entire deck by using Edit > Find and Replace Text....
If the name of a module/PV deck is too long, you can abbreviate it by using either a common shorthand for the name or your best judgment. (See the deck kimigairu for the song Aisarenakutemo Kimi ga Iru as an example.) For puzzle decks of songs, use the full name of the song (if it fits), a dash, the producer's name, and "feat." with the Vocaloid/voicebank used. For example, the deck ghostrule has the text "GHOST RULE - DECO*27 FEAT. HATSUNE MIKU" on the bottom. If the text doesn't fit, abbreviate the song title, not the producer or character name. If more than one vocal is featured in the song, list them as commas, then an & symbol between the final two voicebanks. For example, use "PRODUCER FEAT. HATSUNE MIKU, KAGAMINE RIN & KAGAMINE LEN" or "PRODUCER FEAT. KAGAMINE RIN & KAGAMINE LEN".
If the PV is sourced from a game such as Project Diva, Project mirai, or Project Sekai, add the source in parentheses if it fits (see GHOST RULE (DIVA FT)). Abbreviate it or omit it if it does not fit (KIRAWARETE IRU. (S), AKU NO MESHITSUKAI).
Saving and Exporting
Decks should be named as follows:
- Transliterations of non-English names/song titles as one word. For example: hatsunemiku, meikov3, sunanowakusei.
- For module decks of alternate Virtual Singer characters in Project Sekai, add ln, mmj, vbs, wxs, 25ji, without hyphens, as applicable.
- For PV decks: If the deck is of the original PV uploaded by the producer or other official source, do not append anything to the deck name. If it is an alternate PV, like Project Diva or Project Mirai PVs, add the following:
- Project Diva: -diva, -diva2nd, -divaextend, -divaf, -divaf2nd, -divax, -divamegamix, -divaft, as applicable; abbreviate on decks as (D), (2ND), (EX), (F), (F2ND), (X), (MIX), (FT) when necessary and possible.
- Project mirai: -mirai; abbreviate on decks as (M) when necessary and possible.
- Project Sekai: -sekai; abbreviate as (S) when necessary and possible.
- Live Concerts: -magicalmirai, -mikuexpo, -mikuwithyou, -japanlivetour, and so on, use the full name of the concert; abbreviate on decks as (MM), (ME), (MWY), (LT) when necessary and possible.
- If the full name/title for the template is too long for a Module/PV deck, name the files with the text that appears on the card itself, plus any hyphenated source information (see the decks kimigairu for the song Aisarenakutemo Kimi ga Iru or gaikotsugakudan-divaft for the Diva Future Tone PV of Gaikotsu Gakudan to Riria as examples). Puzzle deck cards should use name that appears on cards 16 - 20 (see inochinikirawareteiru-sekai).
Image Editing Tips
For general tips:
- Try not to make your decks too saturated, blurry, or sharpened. Module's individual cards are small, so heavy editing can change a card very quickly!
- For PV decks, the images will likely have similar lighting and coloring. You may want to adjust all images of the deck at once with a master adjustment layer, and individually readjust the cards for any images that stand out. If you are using Photoshop, the easiest way to do this is to manipulate the layer mask automatically applied to adjustment layers. (See this guide if you are unfamiliar with layer masks.) You can also use other adjustment layers within the individual card folders if you'd like.
- Zoom out of the deck when you're finished adjusting each image and see if the cards seem to "match" each other in terms of saturation, coloring, or brightness. If any card stands out, try adjusting it separately so that all cards flow together.
- If your image is too blurry when resized, try Photoshop's Filter > Sharpen > Smart Sharpen feature instead of a regular sharpened layer; if the image has a lot of noise, try smoothing it out with Filter > Noise > Reduce Noise.
Deck Composition Tips
The darker color used for the deck stripe should go on the bottom of the gradient.
PV decks should follow the video chronologically - that is, the beginning of the video should be card01, and the end should be card20. The mastery badge can be either a key part of the PV, the album art or YouTube thumbnail of the official upload (if included in the donation), etc.
When making puzzle decks, try to place the image's main features (like character faces, eyes, and so on) away from the numbers from each card.
While not required, you can use a mastery badge for puzzle decks that's different from the main deck image, if the donator provides it! This is an easy way to fit an alternate image from PVs that don't have enough image variation to make a full deck of 20 images (see the decks bug and anatasama as examples).